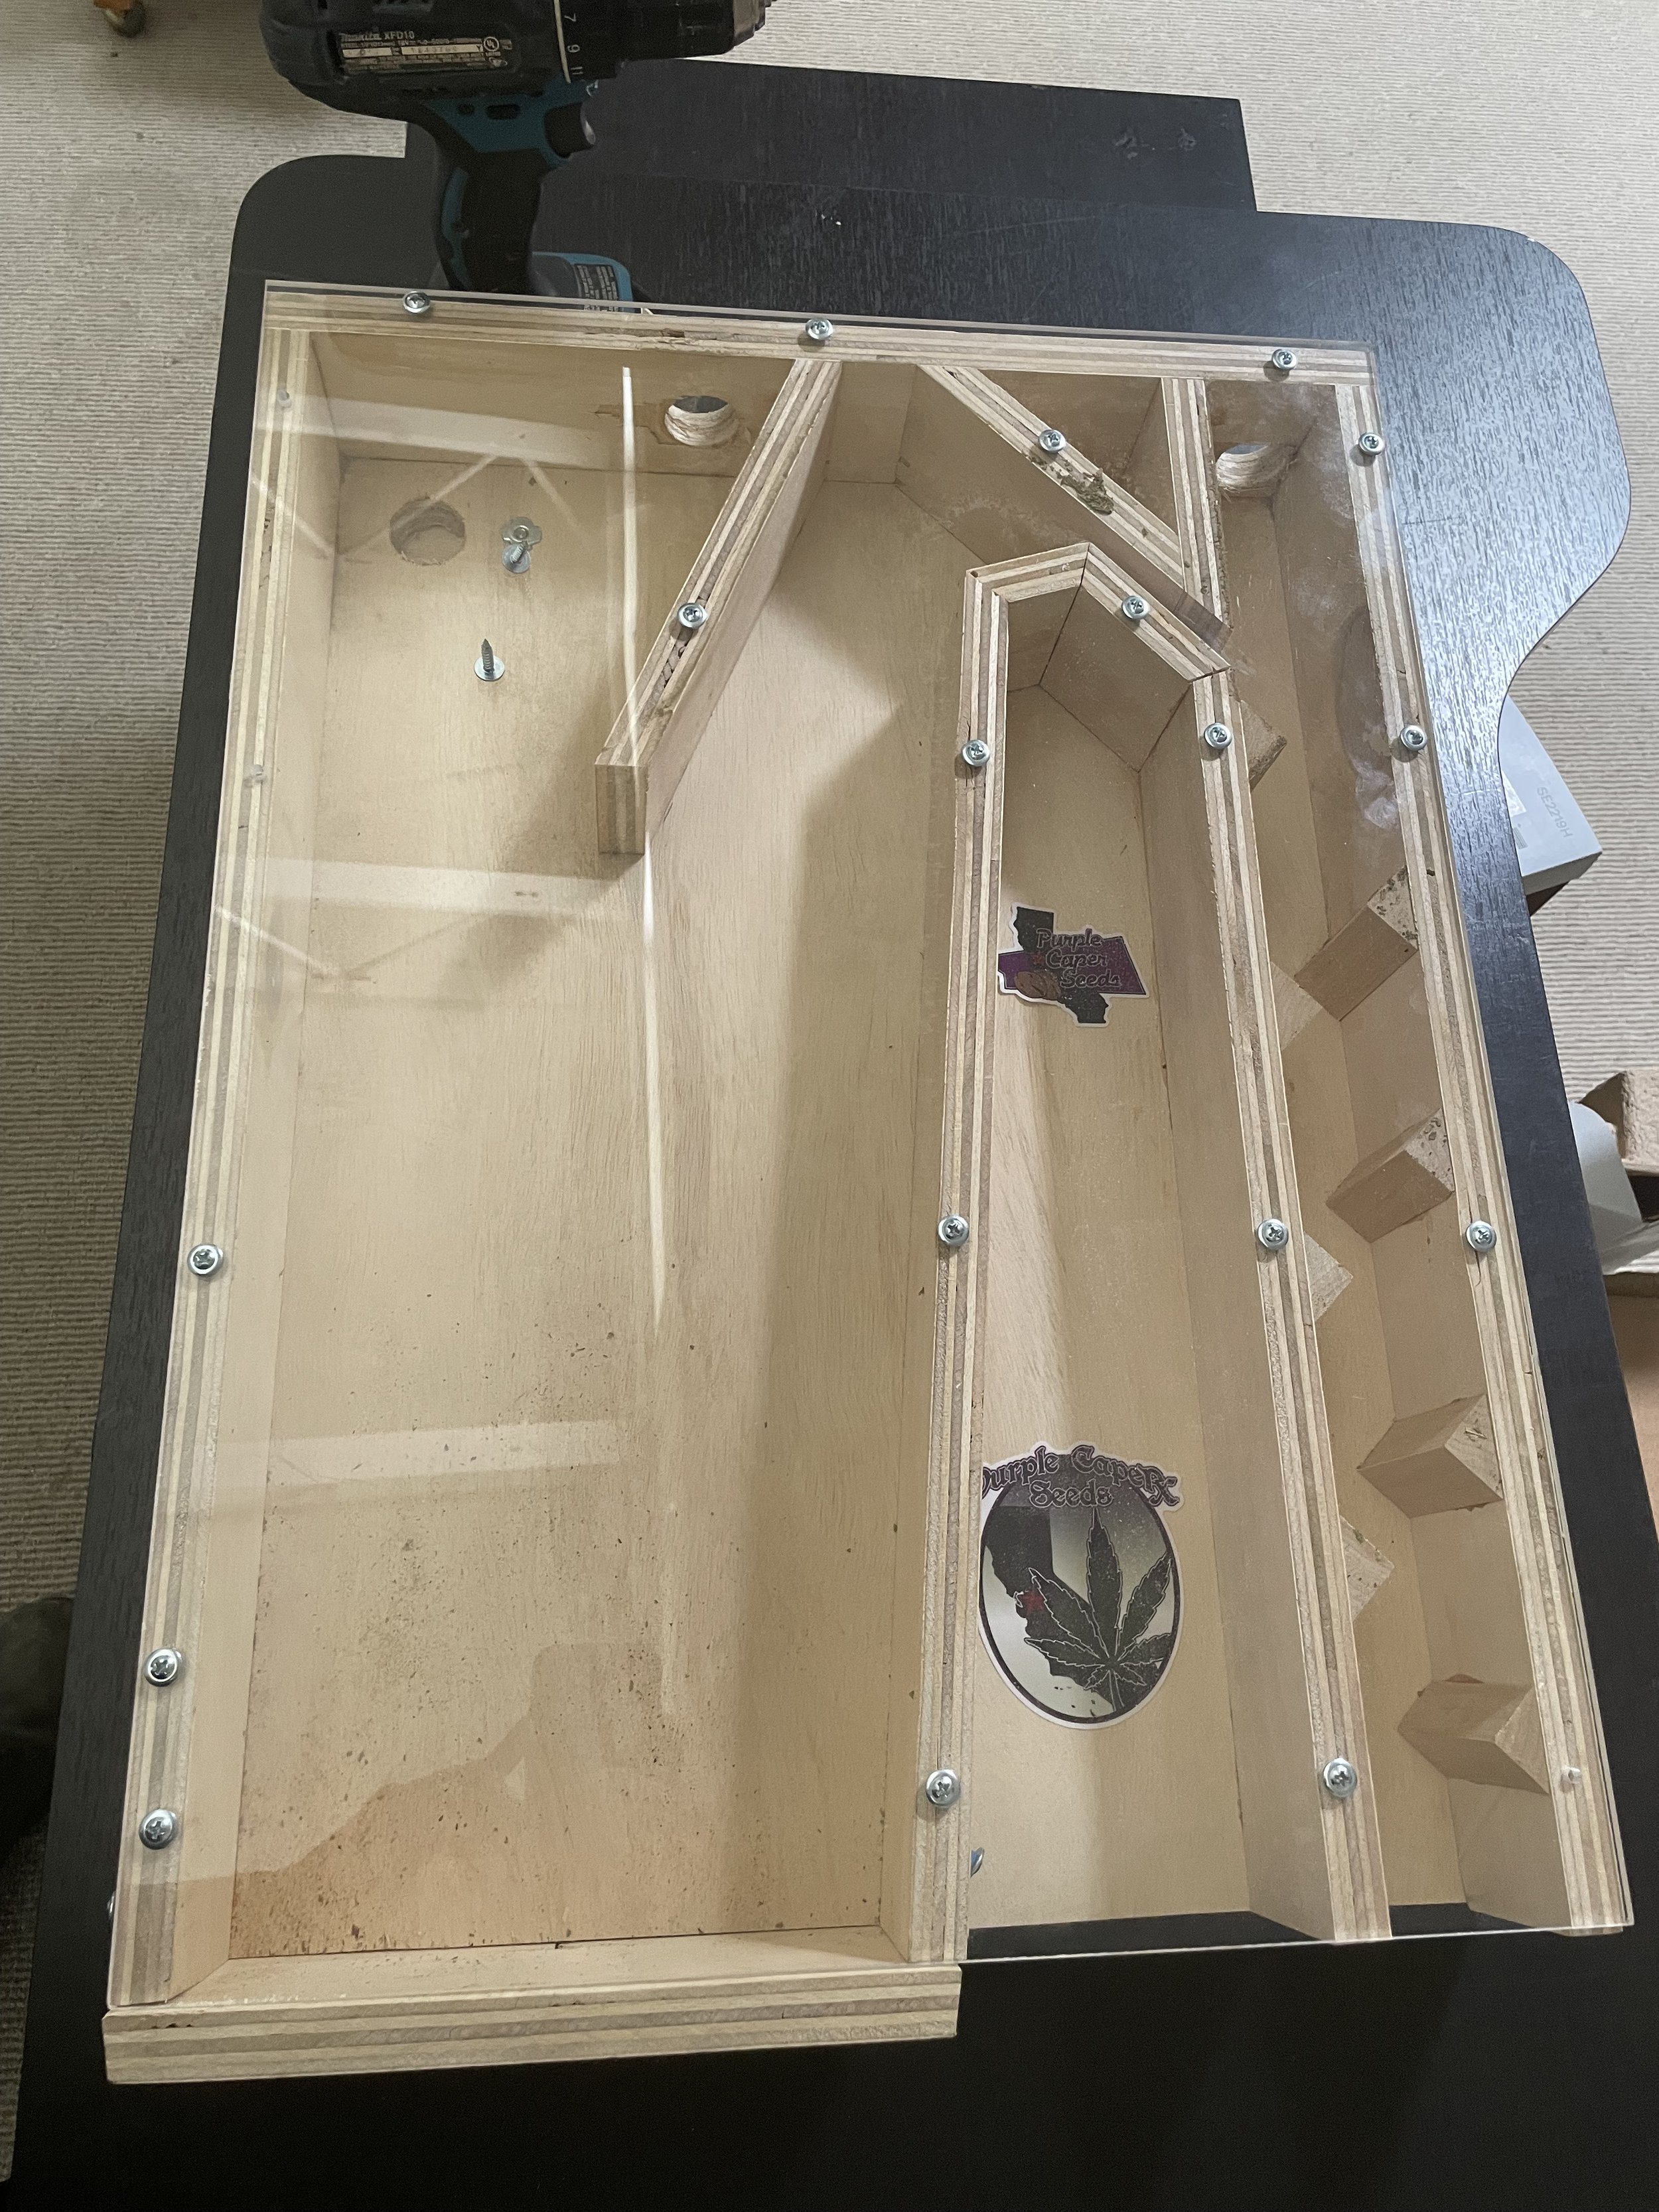
Purple Caper Seeds™ Seed Separator DIY Blueprint & Step-by-Step Build Instructions
Purple Caper is a top cannabis seed breeder known for quality genetics—check out his work at purplecaperseeds.com!
Art (Purple Caper) and I are looking for my best seeded buds to test out his seed separator design.
Looking to build your own seed separator? This DIY guide will help you construct a custom seed separator, perfect for cleaning various crops like hemp, corn, beans, and cannabis. Using Purple Caper Seeds' blueprint, you’ll create a reliable seed cleaner that works effectively with standard shop vacuums and is tuned for maximum efficiency in handling cannabis seeds.
Tools and Materials Needed for Building a Cannabis Seed Separator
Tools Required:
Table Saw and Miter Saw
18-Gauge Nail Gun
Drill
Materials Required:
3/4” x 24” x 48” Sanded Plywood
1/4” x 18” x 24” Plexiglass
8 x 1/8” x 1/2” Rare Earth Magnets (optional for bottom plate) + Super Glue (alternatively, use rubber bands and screws)
Wood Glue
1” Sharp Point Lath Screws (for Plexiglass installation)
#10 x 1 1/2” Machine Screw with Tee Nut (for air valve sliding adjuster piece)
Dimensions for Wood Pieces in DIY Cannabis Seed Cleaner
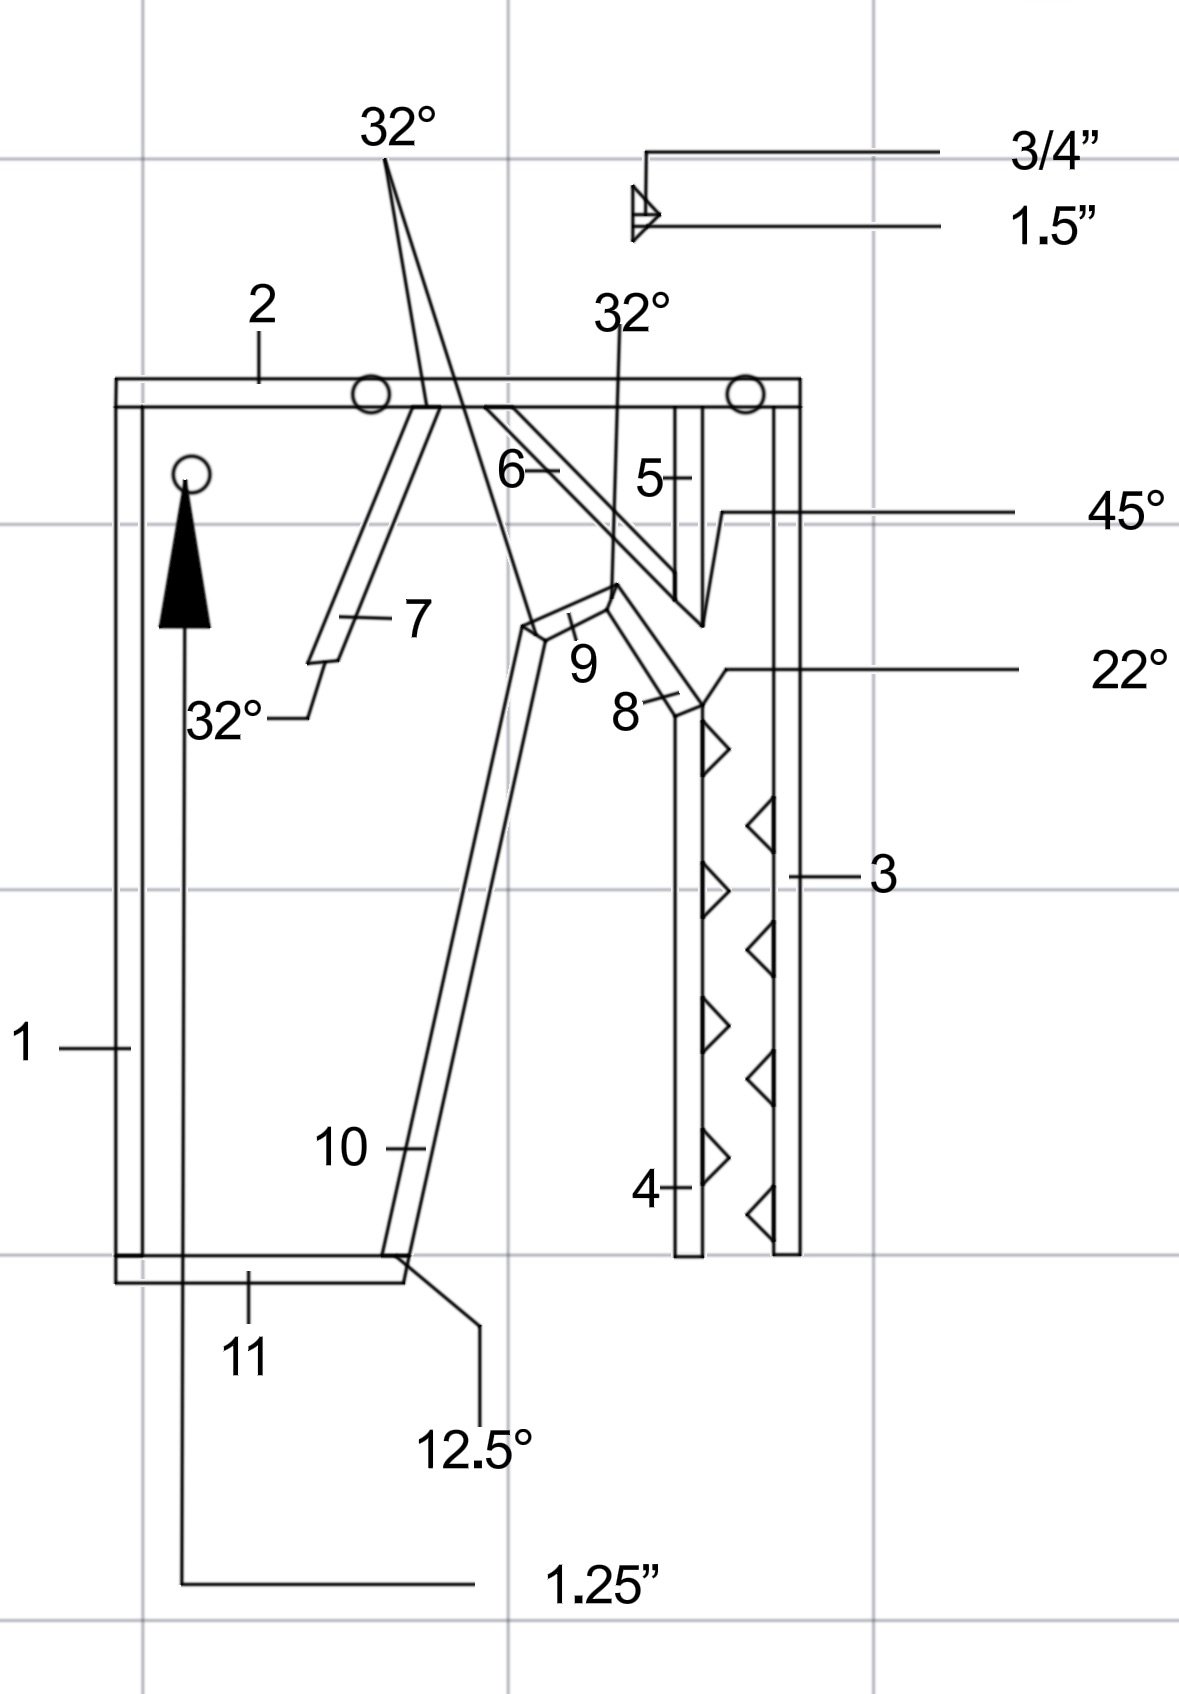
These dimensions suit a 10-gallon shop vac (approx. 2-gallon volume per cleaning run). Refer to the diagram for details on the angle of each board.
Standard Dimensions:
¾” x 2 ¾” x 23 ¼”
¾” x 2 ¾” x 18”
¾” x 2 ¾” x 23 ¼”
¾” x 2 ¾” x 17 ¾”
¾” x 2 ¾” x 4 ¾”
¾” x 2 ¾” x 5 ¾”
¾” x 2 ¾” x 8”
¾” x 2 ¾” x 3”
¾” x 2 ¾” x 2”
¾” x 2 ¾” x 20 ½”
¾” x 3 ¾” x 7 ½” (Bottom Removable Plate)
¾” x 1 ½” x 2 ¾” (Triangle Pieces, 8 total)
¾” x 2” x 4” (Air Valve Sliding Adjuster)
Skinny Mini Dimensions (For Smaller Shop Vacs):
¾” x 2” x 23 ¼”
¾” x 2” x 18”
¾” x 2” x 23 ¼”
¾” x 2” x 17 ¾”
¾” x 2” x 4 ¾”
¾” x 2” x 5 ¾”
¾” x 2” x 8”
¾” x 2” x 3”
¾” x 2” x 2”
¾” x 2” x 20 ½”
¾” x 3” x 7 ½” (Bottom Removable Plate)
¾” x 1 ½” x 2” (Triangle Pieces, 8 total)
¾” x 2” x 4” (Air Valve Sliding Adjuster)
DIY Cannabis Seed Separator Assembly Instructions
1. Cut the Back Piece: Begin by cutting a plywood back piece to 18” x 24” to match the Plexiglass size. This back panel forms the foundation of your seed separator.
2. Cut All Wooden Pieces: Carefully cut all wood pieces to the specified measurements, ensuring accuracy. Each piece plays a critical role in airflow and seed separation within the machine.
3. Assemble Triangle Supports: Glue triangle pieces to boards 3 and 4 first, and allow them to dry completely. These supports are essential for stable airflow.
4. Dry Fit and Measure: Test-fit all pieces before final assembly to ensure your critical measurements are accurate.
5. Secure the Frame: Using wood glue, attach all pieces to the plywood back piece, securing them with a nail gun.
6. Drill Key Holes: Drill three holes – one for intake, one for vacuum outlet on the top, and one air valve hole on the back. These will help regulate airflow within the seed separator.
7. Install Plexiglass Panel: Pre-drill holes in the Plexiglass and then attach it to the wood. This panel enables you to monitor the separation process.
8. Attach Magnets (Optional): Place rare earth magnets on the bottom cover and the machine’s bottom for an airtight fit, or use rubber bands and screws as an alternative.
9. Mount Air Valve: Install the air valve sliding adjuster piece near the valve hole on the back panel.
Tips for Building an Efficient DIY Cannabis Seed Separator
Seal All Pieces: Make sure each joint is well-sealed with glue and nails. Air leaks can disrupt the suction and swirling chambers.
Seal Corners Thoroughly: Use glue, silicone, or urethane adhesive to seal internal corners for optimal airflow.
Smooth Uneven Angles: Use filler to correct any unevenly cut angles.
Sand the Throat Area: Smooth the throat area with 220-grit sandpaper to ensure free flow of air and chaff.
Perfect the Bottom Seal: Ensure the bottom panel sits flush. For a tighter seal, consider adding black tape. Align pieces 1 and 10 with the Plexiglass and the back piece.
Test Fit for Flush Fit: Before attaching pieces #1 and #10, check that piece #11 lies flat against them.
Sand Facing Edges: Sand the areas where wood meets Plexiglass to ensure a tight fit, preventing air leaks.
Align Plexiglass with Corner Screws: Start by installing the corner screws on the Plexiglass to ensure everything aligns.
Pre-Drill Holes: Pre-drill 1/16” holes for screws in both the Plexiglass and plywood, and expand the Plexiglass holes to 1/8” to prevent cracking.
Clean Wood and Plexiglass Surface: Remove any debris to ensure a strong seal between wood and Plexiglass.=
Critical Measurements for Seed Separator Efficiency
Zig-Zag Chamber Width: 2 ¼ inches wide.
Chaff Tunnel (Throat) Dimensions: 1 inch at input, ¾ inch at output.
Wedge Placement: ¾ inch between the 45-degree wedge and the 22-degree stop plate.
Triangle Wedge Spacing: Start the first wedge ¾ inch below the chaff tunnel, and place subsequent wedges 4 inches apart.
Hole Sizes: All holes should be 1 ¼ inches in diameter.
About Our Seed Separator Plans
These cannabis-friendly seed cleaner plans are inspired by various aspirator zig-zag designs, optimized for home and farm use. Our DIY blueprint draws inspiration from:
Real Seeds UK DIY Seed Cleaner
Petkus Selecta ZZ1
KimSeed Zig-Zag Aspirator
Shai Vision Zig-Zag Aspirator
Usage Policy: This design by Purple Caper Seeds™ is open-source for personal, non-commercial use. You’re welcome to build one for yourself, but please credit Purple Caper Seeds and Real Seeds UK if you share these blueprints. Selling cannabis or other seed separators based on this blueprint is not permitted.
By following this guide, you’ll have a reliable, DIY cannabis seed separator that is perfect for small-scale seed cleaning projects!
Purple Caper is a top cannabis seed breeder known for quality genetics—check out his work at purplecaperseeds.com!


